
What is a pinch collar? A pinch collar, often called a prong collar, is a training tool made of metal links with blunt prongs that tighten slightly around a dog’s neck when they pull. Can I use a pinch collar on any dog? Generally, pinch collar use is recommended for dogs over six months old that are strong pullers and have not responded to gentler methods, always under the guidance of a professional trainer.
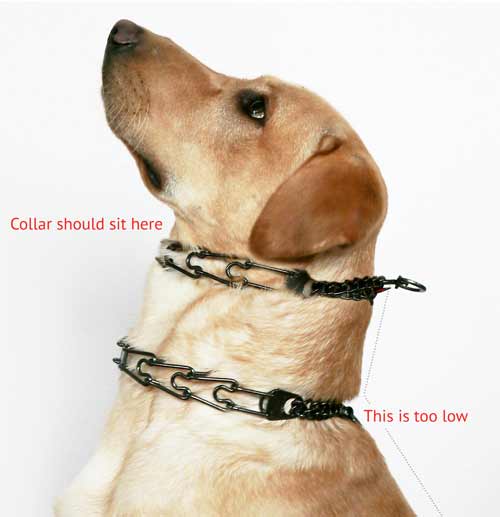
Image Source: leerburg.com
The Essentials of Responsible Pinch Collar Dog Training
Many people ask about using a pinch collar safely. The key is proper training and careful handling. This tool is designed to mimic the corrective pressure a mother dog might put on her pups. It is not a tool for punishment. It is for clear communication in dog obedience training with the pinch collar.
Deciphering the Purpose of the Prong Collar
A prong collar works by applying even pressure around the neck, much like a gentle squeeze. This pressure mimics the corrective nip a dog learns from its mother during puppyhood. When used correctly, the dog learns quickly to stop pulling to avoid that sensation. This makes leash walking much safer and more pleasant for both you and your dog.
It is vital to see the prong collar as a tool for clear feedback, not pain. Humane use of a pinch collar focuses on timely corrections, not prolonged pressure. If you are just leaving the collar on all the time, you are not using it correctly.
Comparing Training Aids: Pinch Collar vs. Other Collars
When starting pinch collar dog training, owners often wonder how it compares to other tools. Let’s look at common alternatives.
| Collar Type | Primary Mechanism | Best For | Potential Downside |
|---|---|---|---|
| Pinch Collar (Prong Collar) | Even, temporary pressure around the neck. | Strong pullers, fast learning. | Requires correct fit and timing. |
| Slip Collar (Choke Chain) | Tightens severely around the throat. | Experienced handlers only. | High risk of injury to the trachea. |
| Martingale Collar | Limits maximum tightening to prevent slipping out. | Dogs with narrow heads (like Greyhounds). | Does not stop pulling effectively. |
| Flat Buckle Collar | Simple holding device. | Dogs that walk well on a loose leash. | Offers no correction for pulling. |
Many people ask about the martingale collar vs pinch collar. A martingale collar is great for safety if your dog slips collars. However, it does not provide the corrective pressure needed for active pulling correction, which is the goal when moving to a prong collar. The slip collar for dogs generally refers to a choke chain, which applies pressure unevenly to the throat, posing a higher risk than the evenly distributed pressure of a quality pinch collar.
Step 1: Selecting the Right Collar and Size
The safety of the tool starts with getting the right one. You cannot achieve minimizing discomfort with pinch collar use without proper sizing.
Choosing the Material and Link Style
Pinch collars come in stainless steel, coated steel, and black oxide.
- Stainless Steel: Best for dogs that swim or spend time outdoors. It resists rust well.
- Coated (Black) Steel: Looks good but the coating can chip off over time, revealing the metal underneath.
Ensure the links are smooth. Cheaply made collars can have rough edges that might irritate the skin.
Determining the Correct Dog Collar Fitting
Fitting a prong collar correctly is the single most important step. An improperly fitted collar is both ineffective and dangerous.
Measuring Your Dog’s Neck
- Measure your dog’s neck where the collar usually sits (usually just behind the ears and under the jaw).
- Add 2 inches to this measurement. This is the approximate size you need to start with.
Adjusting the Collar Links
Most pinch collars come with a full set of links. You must remove excess links to achieve the perfect fit.
- Positioning: The collar should sit high on the dog’s neck, just behind the ears and under the jawbone. It should not rest low down near the shoulders like a standard flat collar.
- The Two-Finger Rule: Once the collar is secured high on the neck, you should only be able to fit one or two fingers snugly between the collar and the dog’s neck. It should feel snug, but not tight enough to restrict breathing or cause discomfort when the dog is relaxed.
- Securing the Snap: Make sure the quick-release snap or buckle is facing forward or to the side, never directly underneath the dog’s chin.
If the collar is too loose, it will slide down the neck, becoming ineffective or dangerous. If it is too tight, it creates constant pressure, which defeats the purpose of timely correction.
Step 2: Introducing the Collar Positively
Never just put the collar on and immediately start training if your dog has never worn one. This can lead to fear or resistance. We must introduce the tool positively first.
Initial Introduction Period
Let your dog wear the properly fitted pinch collar attached to a standard leash for short periods during calm activities, like walking around the yard or playing gentle games. Do not apply any leash pressure during this phase. The goal is for the dog to associate the new collar with normal, happy events.
- Keep initial sessions short (5-10 minutes).
- Offer high-value treats while the collar is on.
- Remove the collar before confinement (like crating) initially, until the dog is fully used to it.
Transitioning from a Flat Collar
If your dog is currently wearing a flat collar, you may choose to keep it on initially as a backup, ensuring it is loose enough not to interfere with the pinch collar. However, many trainers prefer to remove the flat collar entirely during active training sessions to prevent entanglement or confusion.
Step 3: Learning How to Correct Dog with Pinch Collar
This is where timing and technique are crucial. How to correct dog with pinch collar effectively relies on immediate response, not force.
Grasping the Correction Technique
The correction should be a quick “pop and release,” often called a “tap” or “tug.” It should never be a sustained pull.
- Identify the Behavior: Your dog starts to pull forward, lagging behind, or lunging.
- The Grip: Hold the leash correctly. Most trainers recommend holding the leash close to the dog’s neck, using a short lead length when actively correcting.
- The Pop: When the dog pulls, quickly snap your wrist sideways or slightly upward, applying pressure via the leash. This action causes the prongs to tighten momentarily.
- The Release (Crucial Step): The instant you feel the dog slacken the leash or turn toward you, immediately release all pressure. The release is the reward. The dog learns that releasing the tension stops the sensation.
If you hold the pressure, you are essentially choking the dog or causing constant discomfort, which is not humane use of a pinch collar.
Timing: The Key to Effective Correction
Dogs learn through association. The correction must happen at the exact moment the unwanted behavior starts.
- Too Late: If you wait until your dog is already 10 feet ahead and you yank the leash, the dog associates the pain with whatever they are currently looking at (a squirrel, another dog), not their own pulling.
- Too Early: If you correct before the pulling starts, the dog learns nothing useful.
Use positive reinforcement (praise, treats) when the dog walks beside you on a loose leash, even for a second. This balances the correction.
Step 4: Practicing Leash Manners and Loose Leash Walking
The end goal of dog obedience training with the pinch collar is loose-leash walking without needing the collar’s pressure at all.
Starting in a Low-Distraction Area
Begin training in a quiet space, like your hallway or a fenced backyard.
- Have high-value treats ready.
- Start walking. Keep the leash slack.
- If the dog surges ahead, use the quick “pop and release” correction mentioned above.
- The second the leash goes slack, say “Yes!” or “Good!” and reward them near your knee (heel position).
- Repeat this process until the dog anticipates the reward and stays near you.
Managing Environmental Distractions
Once the dog is reliable indoors, gradually move to higher-distraction areas.
- Level 1: Quiet street, no other people or dogs.
- Level 2: Park during off-peak hours.
- Level 3: Busy sidewalk or near other dogs.
If you find you are correcting constantly in a new environment, the environment is too hard for the current skill level. Go back a step. This is part of minimizing discomfort with pinch collar use—avoiding situations where constant correction is needed.
Addressing Lunging and Reactivity
If your dog lunges at specific triggers (other dogs, bikes), the correction needs to be paired with management.
When you see a trigger approaching, give a preemptive, quick correction the moment the dog tenses up, before the full lunge occurs. Immediately follow this with a sharp “Look at me!” command and reward heavily when they redirect focus to you. This teaches them that looking at you earns safety and rewards, while focusing on the trigger earns the brief collar pressure.
Ensuring Safety and Minimizing Risks
Even with correct technique, owners must prioritize safety. This is essential for the humane use of a pinch collar.
Never Leave the Collar Unattended
A major danger is leaving a prong collar on a dog when unsupervised. If the dog scratches or gets caught on something (like a fence, crate bars, or another dog’s collar), the unattended pressure can cause severe injury, including neck trauma or strangulation. Never use a pinch collar as a permanent ID collar. Always switch back to a flat collar when the dog is not actively training or under direct supervision.
Recognizing Signs of Over-Correction or Distress
It is crucial to monitor your dog’s reaction. If the dog shows signs of fear or pain, stop immediately.
Signs to Watch For:
- Excessive whining or yelping during a correction.
- Shying away from you or refusing to engage after a correction.
- Panting heavily when the leash is loose.
- Rubbing the neck excessively after training.
If you see these signs, you are likely pulling too hard or holding the correction too long. Review your technique immediately.
When to Switch Back or Seek Professional Help
If, after several weeks of consistent, correct training, your dog still shows extreme aversion to the collar, or if you are unsure about your timing, it is time to consult a certified professional dog trainer (CPDT-KA or similar certification). They can assess your prong collar use in real-time.
Sometimes, the leash handling skills of the owner need more work than the dog’s behavior. A trainer can help bridge that gap. For many dogs, once they learn the desired behavior, the trainer can remove the pinch collar and transition the dog to a flat buckle collar for maintenance walks.
Professional Guidance in Prong Collar Use
Many reputable trainers endorse the use of the prong collar because of its immediate feedback mechanism, especially compared to tools that rely on prolonged discomfort. However, they stress that it requires expertise.
Finding the Right Trainer
When seeking help for pinch collar dog training, look for trainers who emphasize positive reinforcement alongside the use of aversives (like the prong collar). A good trainer explains why and when to use the tool, focusing on relationship building. Avoid any trainer who promotes fear or uses the collar as a primary means of control rather than clear communication.
Integrating the Collar with Other Tools
A trainer might advise using the pinch collar only during focused leash work and switching to a head halter (like a Gentle Leader) for daily walks if the dog has severe reactivity. This layered approach ensures the dog learns the desired behavior under the most effective tool, while still managing challenging situations safely.
Final Thoughts on Safe and Effective Use
The pinch collar is not a magic fix. It is a communication tool that requires precision and commitment from the handler.
To recap safe use for effective dog obedience training with the pinch collar:
- Fit is paramount: It must sit high and snug behind the ears.
- Corrections must be quick: A tap and release, not a sustained pull.
- Timing is everything: Correct the moment the unwanted behavior starts.
- Reward heavily: Immediately reward slack leash walking.
- Remove when done: Never leave it on unsupervised.
By adhering strictly to these steps, you can use this tool responsibly to achieve clear communication and enjoy walks with your dog.
Frequently Asked Questions (FAQ)
At what age is it safe to start using a pinch collar?
Generally, experts suggest waiting until a dog is physically mature enough to handle neck pressure without damaging developing cartilage, usually around 5 to 6 months old. Always check with your veterinarian or trainer if you have concerns about your specific breed or dog’s development.
Is a pinch collar the same as a choke chain?
No, they are fundamentally different. A choke chain (a type of slip collar for dogs) tightens continually around the throat if pulled, potentially restricting the airway and causing tracheal damage. A well-fitted pinch collar tightens briefly due to the blunt prongs applying even pressure around the neck, and the pressure immediately releases when the dog stops pulling, aiming for correction, not choking.
How often should I correct my dog with the prong collar?
You should only correct when the unwanted behavior (like pulling) occurs. If you are actively training, you might correct many times over a short session. If you are walking and the dog is doing well, you should have zero corrections. Consistency in reward and correction timing is more important than the sheer number of corrections.
Can I use a leash clip at the bottom or the top ring when using a pinch collar?
For basic loose-leash walking, clipping the leash to the center D-ring (the ring connecting the two ends of the collar) provides the most balanced feedback. For addressing reactivity or strong lunging, some trainers recommend clipping to the top ring (the one closest to the buckle or quick-release mechanism) to gain slightly better leverage for a quick correction. Never use both rings simultaneously.