
Can you sew a dog bed with sides? Yes, you absolutely can! Making a dog bed with sides is a rewarding project. It gives your pet a cozy spot to rest their head. This guide will show you how, step-by-step. We will help you make a great DIY dog bed with bolster for your furry friend.
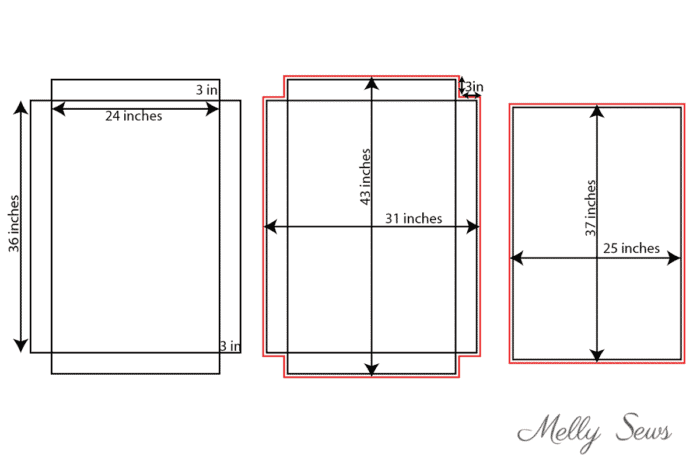
Image Source: mellysews.com
Choosing Your Materials: Getting Ready to Sew
Before you start cutting fabric, you need the right stuff. Good materials make your bed last longer and keep your dog comfy.
Selecting the Best Fabric for Durable Dog Beds
The fabric is key. Dogs can be rough on their beds. You need something tough. Think about where the bed will live. Is it inside or outside?
- For Indoors: Canvas, denim, or heavy-duty twill work well. These fabrics are strong. They handle daily use better than light cotton.
- For Outdoors/Muddy Paws: Look for outdoor canvas or water-resistant polyester. These resist stains and moisture.
- Comfort Matters: While durability is important, the inside should be soft. You can use fleece or soft cotton for the lining if you prefer.
Important Note on Fabric Thickness: If you use thick fabric, like upholstery material, your needle and machine need to handle it. We will discuss machine settings for sewing thick upholstery fabric later.
Filling Your Dog Bed
What goes inside makes the bed soft. Many options exist for filling your bed.
- Polyester Fiberfill: This is common. It is fluffy and easy to find. It is great for the bolster (the sides).
- Memory Foam Scraps: For an homemade orthopedic dog bed with sides, consider using shredded or solid memory foam. This gives great support to older dogs.
- Old Pillows: You can reuse old, clean pillows. This is a cheap way to stuff your bed. This is part of making a pet bed tutorial with pillow stuffing.
Gathering Your Tools
You need a few tools to make this project smooth.
- Sewing machine
- Strong thread (polyester or upholstery thread)
- Sharp scissors or rotary cutter
- Measuring tape or ruler
- Pins or sewing clips
- Iron and ironing board
Planning Your Dog Bed Size
Your dog needs space to sprawl out. Measure your dog when they are sleeping. Measure them from nose to tail while stretched out. Add about 10 to 12 inches to this measurement. This gives them room to turn around.
For the height of the sides (the bolster), measure your dog’s shoulder height. The bolster should be high enough for them to rest their chin on comfortably. Usually, 6 to 10 inches for the side wall height works well.
Cutting Diagram Basics
We are making a simple rectangular dog bed with a separate bolster piece that gets attached. This is often the easiest design for a easy to sew dog couch pattern.
Imagine two main pieces:
- The Base Cushion: This is the main flat part where your dog lies.
- The Bolster/Wall Fabric: This long piece will form the raised sides around the base.
Let’s use an example size. Say you want a medium bed:
| Piece | Dimensions (Inches) | Quantity | Purpose |
|---|---|---|---|
| Base Fabric | 30 x 40 | 2 | Top and bottom of the main cushion |
| Bolster Fabric | 110 x 8 | 1 | Long strip to form the walls |
Note: Add 1/2 inch to all sides for the seam allowance.
Step-by-Step: Sewing Instructions for Pet Bed with Walls
This process involves creating the main cushion and then attaching the raised walls.
Phase 1: Preparing the Base Cushion
- Cut Your Base Fabric: Cut two identical rectangles for the top and bottom of the main cushion area. Remember your seam allowance (usually 1/2 inch).
- Pinning: Place the two base pieces right sides together (the pretty sides facing in). Pin all four edges securely.
- Sewing the Base: Start sewing along one edge, using a straight stitch. Leave a large gap—about 10 to 12 inches—open on one side. This gap is vital. You need it to turn the fabric right side out and stuff the bed later.
- Seam Check: Use a sturdy stitch. If you are using heavy fabric, a longer stitch length (about 3.0 or 3.5 mm) is good.
Phase 2: Constructing the Bolster (The Walls)
This step focuses on constructing a dog bed with a rim. The bolster forms the cozy edges.
- Prepare the Bolster Strip: Take your long strip of bolster fabric. Fold it in half lengthwise, right sides together. Pin along the long edge.
- Sewing the Long Edge: Sew this long edge using a straight stitch.
- Closing the Ends: Now, fold the short ends of the strip inward slightly (about 1/2 inch) and press them. Keep them open for now. You will close them later.
- Creating the Tube: You now have a long fabric tube.
Phase 3: Attaching the Bolster to the Base
This is where the bed starts taking shape. This step is crucial for making a bolstered pet cushion.
- Pinning the Bolster to the Base: Open up the bolster tube you just made. Place the raw edge of the bolster strip against the raw edge of the base cushion top piece (the one you just sewed but left open).
- Matching Corners: Match the corners carefully. Pin the raw edge of the bolster strip all the way around the perimeter of the base cushion top piece. The raw edge of the bolster should line up exactly with the raw edge of the base top.
- Sewing the Bolster: Sew the bolster strip to the base cushion top using your 1/2-inch seam allowance. Sew slowly. Keep the fabric flat. You are sewing one long seam connecting the two pieces.
- Tip for Curves: If your bed has rounded corners, clip the fabric seam allowance around the curve before you turn it. This helps it lay flat later.
Phase 4: Finishing the Structure and Stuffing
- Closing the Bolster Ends: Once you have sewn the entire bolster strip to the base top, you need to close the ends of the bolster tube where they meet. Overlap the ends slightly and sew them shut neatly.
- Creating the Bottom Panel: Take your second base fabric piece (the bottom piece). Place it onto the structure you just assembled. The raw edges of the bottom piece should line up with the raw edges of the bolster fabric. Pin everything securely.
- The Stuffing Hole: You must leave a large opening on this bottom piece—at least 10 inches wide—for stuffing.
- Sewing the Bottom: Sew around the entire perimeter, attaching the bottom panel to the bolster edge. Crucially, leave that large stuffing hole open!
Phase 5: Turning and Stuffing
- Turning Right Side Out: Reach through the opening you left in the bottom panel. Gently pull all the fabric through the hole. Pull slowly. You are now turning the entire bed right side out. The bolster walls should pop up nicely. Press all the seams with an iron.
- Stuffing the Bolster: Begin stuffing the bolster (the raised sides) first. Use your fiberfill. Stuff it firmly but not so hard that it strains the seams. If you are making a DIY dog bed with bolster, a firm side makes a good headrest.
- Stuffing the Base: Once the bolster is full, stuff the center cushion area. If you are using foam, cut it to fit snugly. If using fiberfill, make sure it is even. This creates your pet bed tutorial with pillow stuffing result.
- Closing the Opening: Once the bed is stuffed perfectly—not too floppy, not too stiff—it is time to close the hole. Use a slip stitch (also called a ladder stitch) by hand. This stitch hides the seam beautifully.
Advanced Techniques and Customization
Many people want to know how to make their bed even better. Maybe you want a couch style or need extra support.
Making an Easy to Sew Dog Couch Pattern Style
To make it look more like a couch, you need to create divisions in the stuffing.
- Marking Divisions: Before stuffing, use tailor’s chalk to mark where you want internal seams to go. These seams will separate the main sleeping area from the bolster area, and maybe divide the bolster into sections.
- Sewing Channel Seams: After stuffing the bolster firmly, sew lines from the top edge of the bolster down into the base fabric where you marked. This locks the stuffing in place.
- Creating Seat Tufting: For the main cushion, you can create tufting. Sew a line from the top center of the base, through the stuffing, and anchor it to the bottom fabric. This keeps the filling from shifting too much, especially important if you have a homemade orthopedic dog bed with sides that relies on foam.
Dealing with Heavy Fabric: Machine Settings for Sewing Thick Upholstery Fabric
If you chose a tough exterior, your machine needs adjustment. Sewing thick fabric, like outdoor canvas or heavy denim, requires specific settings.
| Setting Adjustment | Recommended Change | Why? |
|---|---|---|
| Needle | Use a “Heavy Duty” or “Jeans/Denim” needle (size 14/90 to 16/100). | A dull or standard needle will break or skip stitches. |
| Stitch Length | Increase length slightly (3.0 mm to 3.5 mm). | Shorter stitches on thick layers can cause bunching or stress the machine. |
| Presser Foot Pressure | Increase the pressure if your machine allows it. | This helps grip the thick layers firmly and feed them evenly. |
| Speed | Sew slower, especially around corners. | Slow speed gives you control and prevents the needle from getting stuck. |
If your machine struggles to push the fabric through, use a walking foot. A walking foot grabs the top and bottom layers simultaneously, ensuring even feeding.
Making it a No-Sew Dog Bed with Raised Edges (The Alternative)
While this guide focuses on sewing, some people prefer a no-sew dog bed with raised edges. This usually involves using strong adhesives, fabric glue, or large safety pins/snaps.
- No-Sew Method Overview: You would cut two large pieces for the base. Then, you fold a heavy blanket or towel multiple times to create the bolster shape. You secure the bolster shape around the edges of the base fabric using heavy-duty fabric tape or strong clips/snaps. The center cushion is often just a thick pad inserted into a fabric sling you create. This is less durable than sewing but much faster.
Care and Maintenance for Your New Bed
A well-made dog bed should last a long time. How you clean it matters greatly.
Washing Tips
If you used durable, washable fabric (like canvas), cleaning is simpler.
- Spot Clean First: For small messes, wipe them immediately with a damp cloth.
- Machine Washing (If Possible): If your bed fits in your machine, wash it on a gentle cycle with cold water. Hot water can cause shrinking or degrade foam.
- Drying: Air drying is always best for thick items. If you must use a dryer, use low heat. High heat can melt synthetic fibers or break down any foam inside.
Bolster Integrity
The sides are the first things to sag. If the bolster loses its shape:
- If the seam is intact, you can sometimes open a small area near the corner and add more stuffing.
- If the fabric is worn out, you might need to replace the outer cover. This is why making the cover removable is a great idea for future projects.
Final Thoughts on Pet Bed Construction
Sewing a dog bed with sides provides maximum comfort and support. It allows you to customize the size, shape, and firmness exactly to your pet’s needs. Whether you are building a simple sleeping spot or a luxurious DIY dog bed with bolster, following these steps ensures a sturdy, long-lasting result. Take your time, especially when sewing the corners and attaching the bolster rim, and you will create a perfect retreat for your dog.
Frequently Asked Questions (FAQ)
H5: How thick should the side walls (bolster) be for an average Labrador?
For a Labrador, the bolster height should generally be between 8 and 10 inches before stuffing. This allows them to rest their head comfortably while still keeping the center deep enough to feel secure.
H5: Can I skip sewing the inside of the bolster and just stuff it loosely?
No, you should not skip sewing the structure of the bolster. If you do not sew the bolster into a defined tube, the stuffing will shift immediately. When you turn it inside out and stuff it, it will just become a floppy lump rather than a supportive rim.
H5: What is the difference between a bolster and a rim when making a pet bed?
In this context, they mean the same thing. The bolster or rim refers to the raised, stuffed edges that surround the main sleeping cushion. They provide a place for the dog to lean or rest its head.
H5: Is it okay to mix fabric types for the base and the bolster?
Yes, it is often recommended. You might use a very durable, slightly rough fabric for the base (where chewing might occur) and a softer fleece or velvet for the inside surface of the bolster if you prefer coziness there. Just ensure all fabrics used are machine washable if you plan to wash the bed.