
Can I give my dog subcutaneous fluids at home? Yes, many dogs can safely receive subcutaneous fluid administration dog treatments at home, provided a veterinarian has prescribed it and thoroughly trained the owner on the proper technique.
Subcutaneous hydration in dogs is a common and vital treatment. It helps dogs who cannot drink enough water or need extra fluids due to illness. This method, often called “Sub Qs,” allows fluids to be slowly absorbed just under the skin. It is a key part of dog fluid therapy at home for managing conditions like chronic kidney disease or mild dehydration. Proper canine subcutaneous fluid technique ensures the dog is comfortable and the fluids are absorbed well.
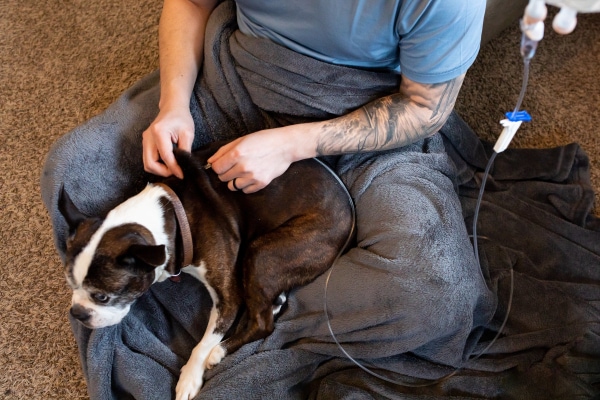
Image Source: toegrips.com
Why Use Subcutaneous Fluids for Dogs?
Vets often suggest SQ fluids for canine dehydration when a dog has mild to moderate fluid loss. If a dog cannot hold down water or is too weak to drink, giving fluids under the skin helps maintain hydration levels. This therapy supports organ function and helps the dog feel better faster.
Veterinary fluid administration dog protocols vary. For less severe cases, subcutaneous (under the skin) methods are preferred over intravenous (IV) methods because they are easier to manage outside a hospital setting.
Preparing for Subcutaneous Fluid Administration
Success in how to give sub Q fluids to a dog starts with good preparation. Gather all your supplies before you start. A calm environment is crucial for keeping your dog relaxed during the process.
Essential Supplies Checklist
Make sure you have the right tools ready. This setup ensures a smooth and sterile process.
- Prescribed Fluids: Only use the type and amount your vet ordered. These are usually Lactated Ringer’s Solution (LRS) or 0.9% Saline.
- Syringe: A clean, new syringe of the correct size.
- Needle: The correct needle size is important. See the next section for details on the best needle size for dog SQ fluids.
- Antiseptic Wipes: Use alcohol swabs or chlorhexidine wipes to clean the injection site.
- Treats and Comfort Items: Have favorite treats ready for positive reinforcement.
- A Helper (Optional but Recommended): A second person can help keep the dog still and calm.
Selecting the Right Needle Size
Choosing the right needle affects comfort and absorption. Too large a needle causes more pain and tissue damage. Too small a needle makes the process slow.
| Dog Size Category | Recommended Needle Gauge | Recommended Needle Length |
|---|---|---|
| Small Dogs (Under 15 lbs) | 22 or 23 Gauge | 1/2 inch |
| Medium Dogs (15–50 lbs) | 20 or 22 Gauge | 5/8 inch |
| Large Dogs (Over 50 lbs) | 18 or 20 Gauge | 1 inch |
Always confirm the best needle size for dog SQ fluids with your veterinarian. They tailor the size to your dog’s skin thickness and the volume of fluid being given.
Step-by-Step Guide to Injecting Fluids Under Dog’s Skin
Follow these steps carefully for safe injecting fluids under dog’s skin. Keep movements slow and gentle throughout the process.
Step 1: Prepare the Fluids and Needle
- Warm the Fluids (Slightly): Cold fluids can make the dog shiver. Let the bag sit at room temperature or wrap it in a warm (not hot) towel for a few minutes.
- Draw Up the Fluid: Attach the needle securely to the syringe. Pull the plunger back to the required dose. Insert the needle into the fluid bag port (or vial stopper). Slowly draw the fluid into the syringe.
- Remove Air Bubbles: Hold the syringe upright. Tap the barrel gently to make any air bubbles rise to the top. Push the plunger slowly to expel all air. This is vital; air in the tissue feels strange to the dog.
Step 2: Positioning and Restraint
The dog should be standing or lying comfortably. If possible, have one person gently hold the dog steady while the other administers the injection. Keep the dog distracted with praise or a lick mat if they enjoy them.
Step 3: Identifying the Injection Site
The best spots for subcutaneous fluid administration dog treatments are areas with loose skin and few nerves.
- Scruff Area (Neck/Shoulders): This is the most common spot. Gently lift the skin between the shoulder blades.
- Flank Area: The sides of the body, just in front of the rear legs. Lift the skin in this area as well.
Step 4: Creating the Tent
Use your non-dominant hand to gently pinch the loose skin at the chosen site. Pull the skin upward slightly until it forms a small pocket or “tent.” This tent creates the space between the skin and the muscle where the fluid needs to go.
Step 5: Inserting the Needle
- Clean the Area: Wipe the outside of the skin tent with an alcohol swab and let it dry completely.
- Insert the Needle: Hold the syringe like a dart. Quickly insert the needle through the tented skin, aiming toward the base of the tent, but do not push it all the way through to the other side. You should feel a slight “pop” or decrease in resistance as you enter the subcutaneous space.
- Confirm Placement: Gently pull back on the plunger slightly. If blood enters the syringe, you have hit a blood vessel. If this happens, withdraw the needle slightly and recheck placement. You should see clear fluid, not blood.
Step 6: Administering the Fluids
Slowly and steadily push the plunger down to inject the fluid. A faster injection hurts more and can cause fluid to leak back out.
- Watch for Swelling: If you see a large, firm lump forming quickly, the fluid might be going into the muscle or leaking out. Slow down or stop if the dog shows distress.
- Give Time for Absorption: The fluid needs time to spread under the skin. If you inject too fast, you create a tight balloon of fluid that is uncomfortable.
Step 7: Post-Injection Care
- Withdraw Needle: Once the syringe is empty, smoothly withdraw the needle.
- Massage (Optional): Gently massage the injection site for a minute or two. This helps disperse the fluid and encourages faster absorption.
- Reward: Immediately give your dog praise and a high-value treat. Positive association makes the next session easier.
Troubleshooting Common Issues in Dog Fluid Therapy at Home
Even with training, issues can arise when performing dog fluid administration training at home. Knowing how to handle these makes the process less stressful.
Fluid Leakage
If fluid leaks out of the injection site as you inject, it means the needle poked through both sides of the skin tent, or the hole was too large.
- Fix: Immediately stop injecting. Withdraw the needle slightly and redirect it into the pocket. If leakage is significant, you may need to restart the injection in a new spot. Massaging the area can help push leaked fluid back in, but often the leaked amount is lost.
Lump Formation
If a large, hard lump forms, the fluid may have entered the muscle layer instead of the subcutaneous space, or the injection rate was too fast.
- Fix: Ensure you are getting that “tent” of skin. For subsequent injections, try a different spot, possibly shallower, and inject much slower. Most small lumps will resolve as the body absorbs the fluid over a few hours.
Dog Resistance or Anxiety
If your dog fights the procedure, forcing them can lead to injury or a lifelong fear of needles.
- Fix: Slow down the process. Incorporate dog fluid administration training sessions that do not involve actual injections at first. Let the dog sniff the supplies. Give treats just for sitting still next to you. Use calming pheromones or soft music. If needed, ask your vet about mild sedation options for anxious dogs.
Site Rotation and Skin Health
You should never inject fluids into the exact same spot twice in a row. Rotating sites is key to preventing skin irritation and tissue damage, which is crucial for long-term subcutaneous hydration in dogs.
Best Sites for Rotation
Keep a simple map or log of where you injected last time. Aim to rotate between these general areas:
- Left Scruff
- Right Scruff
- Left Flank
- Right Flank
Avoid sites that look red, bruised, or bumpy from previous injections. If a site feels hard or inflamed, skip it for at least 48 hours.
Understanding Fluid Absorption Rates
When performing veterinary fluid administration dog treatments at home, knowing how fast the fluid should disappear is helpful.
Generally, fluids given subcutaneously take several hours to be fully absorbed. A small bubble of fluid should start to soften and flatten within 30 minutes to an hour. If the lump remains firm and large for over 6 to 8 hours, the absorption is too slow.
Slow absorption can be caused by:
* Cold fluids.
* Injection into muscle tissue instead of under the skin.
* Severe underlying illness affecting circulation.
If absorption is persistently slow, contact your veterinarian immediately.
Dosage Calculation and Monitoring
The amount of fluid prescribed depends entirely on your dog’s weight, current hydration status, and diagnosis. Your vet will provide a specific dose (e.g., 100 mL per 10 lbs of body weight).
Never guess the dosage. Always confirm the total volume to be administered per session with your veterinary professional.
Monitoring for Over-Hydration
While rare with at-home SQ therapy, too much fluid can cause problems. Watch for these signs:
- Severe panting or restlessness shortly after administration.
- Swelling in the legs or belly.
- Lethargy or weakness following treatment.
If you suspect your dog has received too much fluid, call your vet right away.
Long-Term Management and When to Seek Immediate Care
Dog fluid therapy at home is usually a supportive measure. It manages symptoms, but it doesn’t always cure the underlying disease. Regular veterinary check-ups remain essential.
When to Call the Veterinarian Urgently
While SQ fluids are generally safe, seek immediate veterinary attention if you notice:
- Vomiting or diarrhea starting after fluid administration.
- Signs of severe pain or refusal to move the area injected.
- Lethargy or collapse, indicating the fluid treatment isn’t helping the underlying problem.
- Signs of infection at the injection site (heat, pus, severe redness).
- Your dog stops drinking entirely, even with home support.
Advanced Topics: Techniques Beyond the Basics
For owners administering fluids frequently, refinement of the canine subcutaneous fluid technique can improve compliance and comfort.
Using an IV Set for Large Volumes
If your dog needs a very large volume of fluid daily (e.g., 500mL or more), using a complete IV administration set (which uses a drip chamber and a longer line) can be easier than repeatedly refilling a syringe.
- Consult Your Vet: Ask your vet if they can provide an IV line setup compatible with your prescribed fluid bag.
- Use a Butterfly Catheter (If Approved): Some owners use a small catheter taped to the skin after the initial poke. This avoids repeated needle pokes. This step requires specific dog fluid administration training from a veterinary professional and is not suitable for all dogs or all conditions.
Making It a Positive Experience
Positive reinforcement is the core of successful dog fluid administration training.
- Desensitization: Spend days letting the dog touch and smell the supplies without touching them.
- Practice “Pinching”: Practice gently pinching the skin in the desired locations during relaxed petting sessions, immediately followed by a high-value reward.
- Timing: Administer fluids when the dog is naturally sleepy or just waking up, rather than when they are excited to play.
Conclusion: Partnering with Your Vet
Administering SQ fluids for canine dehydration is a powerful tool in managing chronic illness. It empowers owners to provide excellent supportive care at home. Success hinges on precise technique, sterile practices, and constant communication with your veterinary team. By mastering injecting fluids under dog’s skin carefully and consistently, you play a direct role in your dog’s comfort and long-term health.
Frequently Asked Questions (FAQ) About Dog Subcutaneous Fluid Therapy
Q: How often can I give my dog subcutaneous fluids?
A: This is determined strictly by your veterinarian. It can range from once every other day to twice a day, depending on the dog’s condition and the prescribed volume. Never change the frequency without veterinary guidance.
Q: What does it mean if the fluid feels hard under my dog’s skin?
A: A hard lump means the fluid is not absorbing quickly. This can happen if the fluid is too cold or if it was injected into the muscle instead of the fatty layer under the skin. Check the site next time and inject much slower.
Q: Can I reuse needles for my dog’s subcutaneous fluids?
A: No. Needles must always be new and sterile for every injection session. Reusing needles dulls them, causing much more pain, and risks introducing bacteria into the sterile fluid or the injection site.
Q: Is it painful for my dog to receive SQ fluids?
A: Most dogs tolerate it well, especially when the best needle size for dog SQ fluids is used and the injection is quick. The biggest discomfort usually comes from the initial needle prick, which is why quick, confident insertion is key.
Q: What if I miss the skin tent entirely?
A: If you inject the fluid into the outer layer of skin (epidermis), it will likely cause a small welt and may leak out immediately. If you inject into the muscle (deeper than intended), it can cause soreness. If a small amount leaks, you may need to give a little extra fluid at the next session if your vet approves, or just monitor the dog closely for soreness. If you inject a large amount into the muscle, call your vet.
Q: Are there any signs that my dog is handling the subcutaneous hydration in dogs well?
A: Good signs include increased energy, improved appetite, less excessive thirst (if applicable), and normal urination frequency. If your dog seems brighter after the treatment, it is likely helping.